Advanced NPM Tricks and Fun
, on JavaScript, Node.js
Hello folks, whassup? Busy in managing your node packages? Let’s find more about NPM.
NPM — The Node Package Manager is a program to find and install Node packages. It is really not a part of the Node, it just comes bundled with the Node binaries, as it is very popular package manager out there. But truth to be told, it is not only available package manager for the Node. Recently Facebook released its in-house made package manager called Yarn. Facebook claims Yarn is faster than the NPM, which to a certain extent is true.
Most people gets confused when talking about NPM. There are essentially two different things. First is an NPM registry which is available at https://www.npmjs.com and second is an NPM CLI (Command Line Interface) available at https://github.com/npm/npm, and they both work together out of the box.
NPM CLI can be configured to work with the different registries, e.g., your own private registry. NPM CLI can also be used with Git repositories directly. e.g., if you want to install Express.js then you can point to Github repo while installing it with the command npm install expressjs/express
Here expressjs is the organization that is hosting the express project on the Github. This command would install the Express.js from the latest commit of the master branch of the Github repo. You can verify this by executing the command npm ls --depth=0, which would list all the packages currently installed inside the node_modules directory of the current directory.

As you can see it is showing the HEAD commit.
We can also install a Github repo package from a specific commit or tag or branch. e.g., if we want to install Express.js version 4.15.3 directly we can execute the command npm i expressjs/express#4.15.3 (note, npm i is an alias to npm install).
Normally, when we execute the command npm i, it would go over the network, resolve and install packages. But there is an option --dry-run that would let you know what packages are going to be installed, instead installing them actually.
We normally install some packages globally, like grunt-cli, gulp-cli, express-generator and so on. To list all of them just execute the command npm ls -g, but it would print all of the trees. To print only the first level of the tree instead, we can provide additional argument --depth=0 to the command.
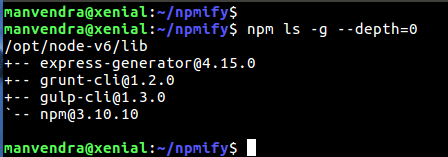
You probably might have guessed, this command would also work for your project directory that contains a package.json file, e.g. npm ls --depth=0.
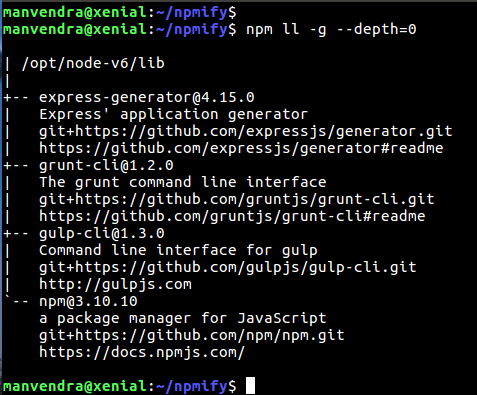
By the way, you can use the command npm ll -g --depth=0 to get more details about the installed packages.
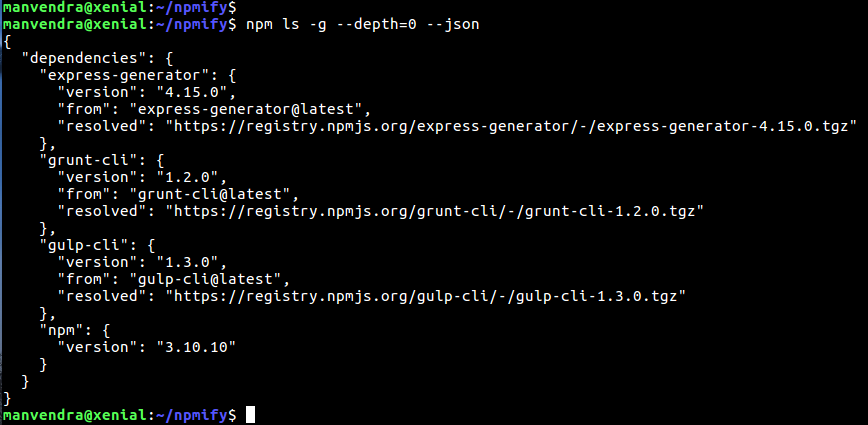
You can even get the result in JSON format with the command npm ls -g --depth=0 --json, in case you need to access programmatically what modules are installed either locally or globally.
This particular ls command has various options, check out them all with the command npm help ls.
If you remember from the beginning, we installed Express.js. That command created a node_modules directory and installed Express.js into it without documenting anywhere what we installed. This is a bad practice. Whenever we install anything, we should document it. The best way to document something is inside the package.json file. A package.json file should at least contain two keys name and version as shown below:
{
   "name": "npmify",
   "version": "1.0.0"
}
The name field should all be in lowercase and version should follow the semantic versioning system of the Node which consists of major.minor.patch.
We can generate a package.json file with the command npm init, and answering all of the questions it asks. If you are too lazy to answer them all, just use the command npm init -y, which would generate a package.json file with all the default values.
To save something inside this package.json use --save or --save-dev parameters (-S and -D are short aliases, respectively). This would save the dependency either under the dependencies key or under the devDependencies key.
E.g., executing npm i -S jquery and npm i -D qunitjs would result in the following package.json.
{
	"name": "npmify",
	"version": "1.0.0",
	"dependencies": {
		"jquery": "^3.2.1"
	},
	"devDependencies": {
		"qunitjs": "^2.3.2"
	}
}
There is one more option to npm i command, --save-optional or -O, which would install the optional dependencies under the optionalDependencies key.
To update all of the installed packages we can use the command npm update or npm update jquery (to update only one particular package). This command would update the packages according to the version range specified in the package.json file, which we will talk about in a new post.
Sometimes we need to update the npm itself. We can update it with the command npm i -g npm.
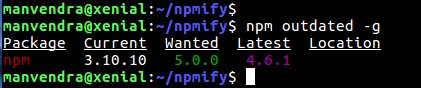
To check if installed packages are outdated we can use the command npm outdated or npm outdated -g (to list global outdated packages). E.g.,
NPM itself provides many configuration options that we can find with the command npm config list -l. We can modify these configurations at per our ease, e.g., if you use the command npm init a lot, then it makes sense to provide a default author name, which we can do with the command npm config set init-author-name "Manvendra Singh".
To delete any particular config you can use the delete subcommand, e.g., to delete the default author name, we just added, use the command npm config delete init-author-name.
I highly recommend that you set the save configuration to true as it would automatically document any package inside the package.json you install without specifying --save or -S option. Just use the command npm config set save true.
Another useful command is npm search. This would search the NPM registry right from your command line, instead of you going to NPM website and search there, e.g., to search about babel, issue the command npm search babel.
If you notice carefully in the following image you can see the packages locally installed, but pay special attention to express@4.15.3 package and the error at the bottom. What is an extraneous package anyway? It is a package that is installed inside the node_modules directory but does not actually exist inside the package.json file. To remove any extraneous package just use the command npm prune.

Many times when we execute npm i and find out to our darkest surprise that our project breaks and does not build anymore. The main reason behind it is how npm i works. By default, NPM tries to upgrade our package to latest minor version, as it is listed on the package.json file with a caret character. To remedy this issue we can use npm shrinkwrap command. This command would generate a npm-shrinkwrap.json file containing all of your dependencies locked down to exact versions which should be installed upon next npm i command. This file should be committed to the VCS (Version Control System).
Be sure to include the --dev argument, because by default devDependencies will not be added to the npm-shrinkwrap.json file. However, starting with version 4.0.1, npm shrinkwrap will also include the devDependencies.
Keep in mind that the npm shrinkwrap command will fail, if you have any extraneous packages installed, or in other words you do not have a package listed inside the package.json, but is available/installed in the node_modules directory.
Apart from these helpful commands we learned, there are also some fun commands waiting for you!
E.g., the command npm home jquery would open the website of the jQuery library and npm repo jquery would open the Github repo right from the command prompt.
How cool is that? PRETTY MUCH, eh!
There are some easter eggs which npm has up its sleeves. E.g, Try executing npm visnup and you would get following in the terminal
And one other is Christmas easter egg which you can get by executing the command npm xmas
I hope you really did enjoy this post. Please let me know in the comments 🙂.
Thanks for reading till here. See you next time.